DayPilot
| Demo | |
|---|---|
| Downloads | |
| Languages | JavaScript |
Overview
-
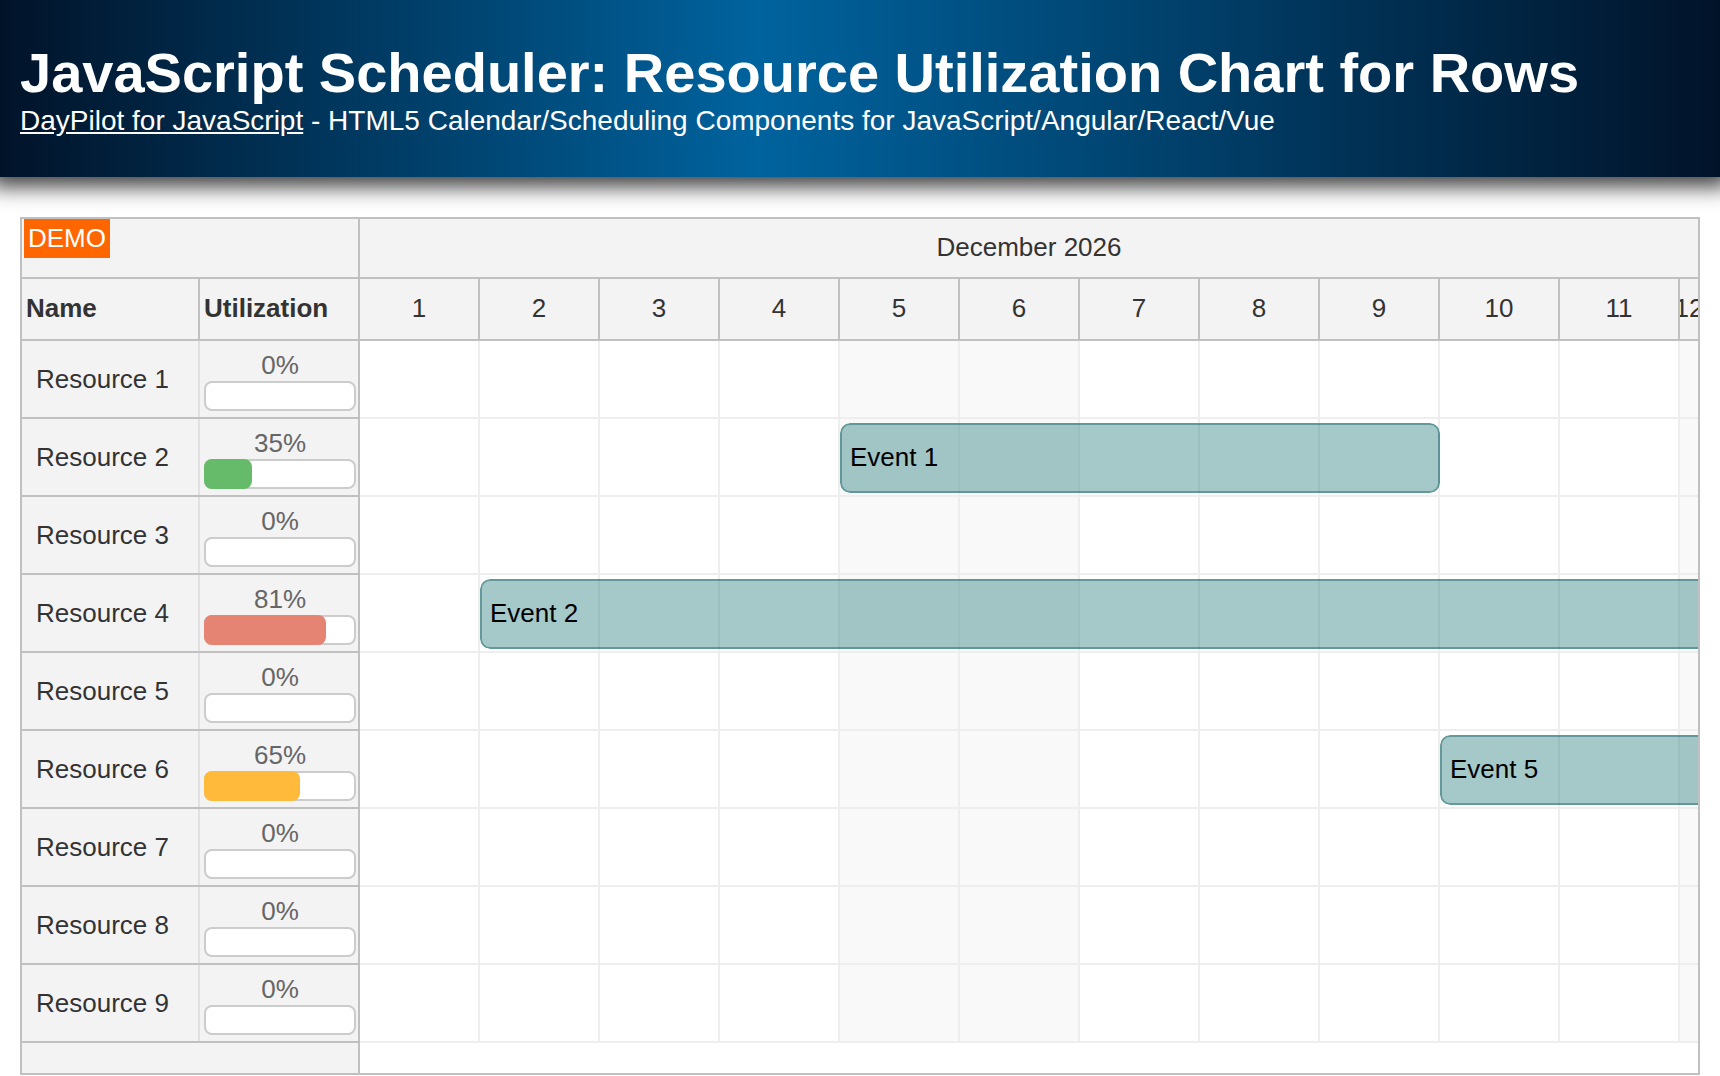
Calculate the percentage utilization of each resource displayed by the JavaScript Scheduler component.
-
Display utilization and availability details in the Scheduler row header.
-
Show a utilization bar chart for a quick overview.
-
The downloadable project includes a trial version of DayPilot Pro for JavaScript (see License below).
License
Licensed for testing and evaluation purposes. Please see the license agreement included in the sample project. You can use the source code of the tutorial if you are a licensed user of DayPilot Pro for JavaScript. Buy a license.
Calculating Resource Utilization for Visible Time Range
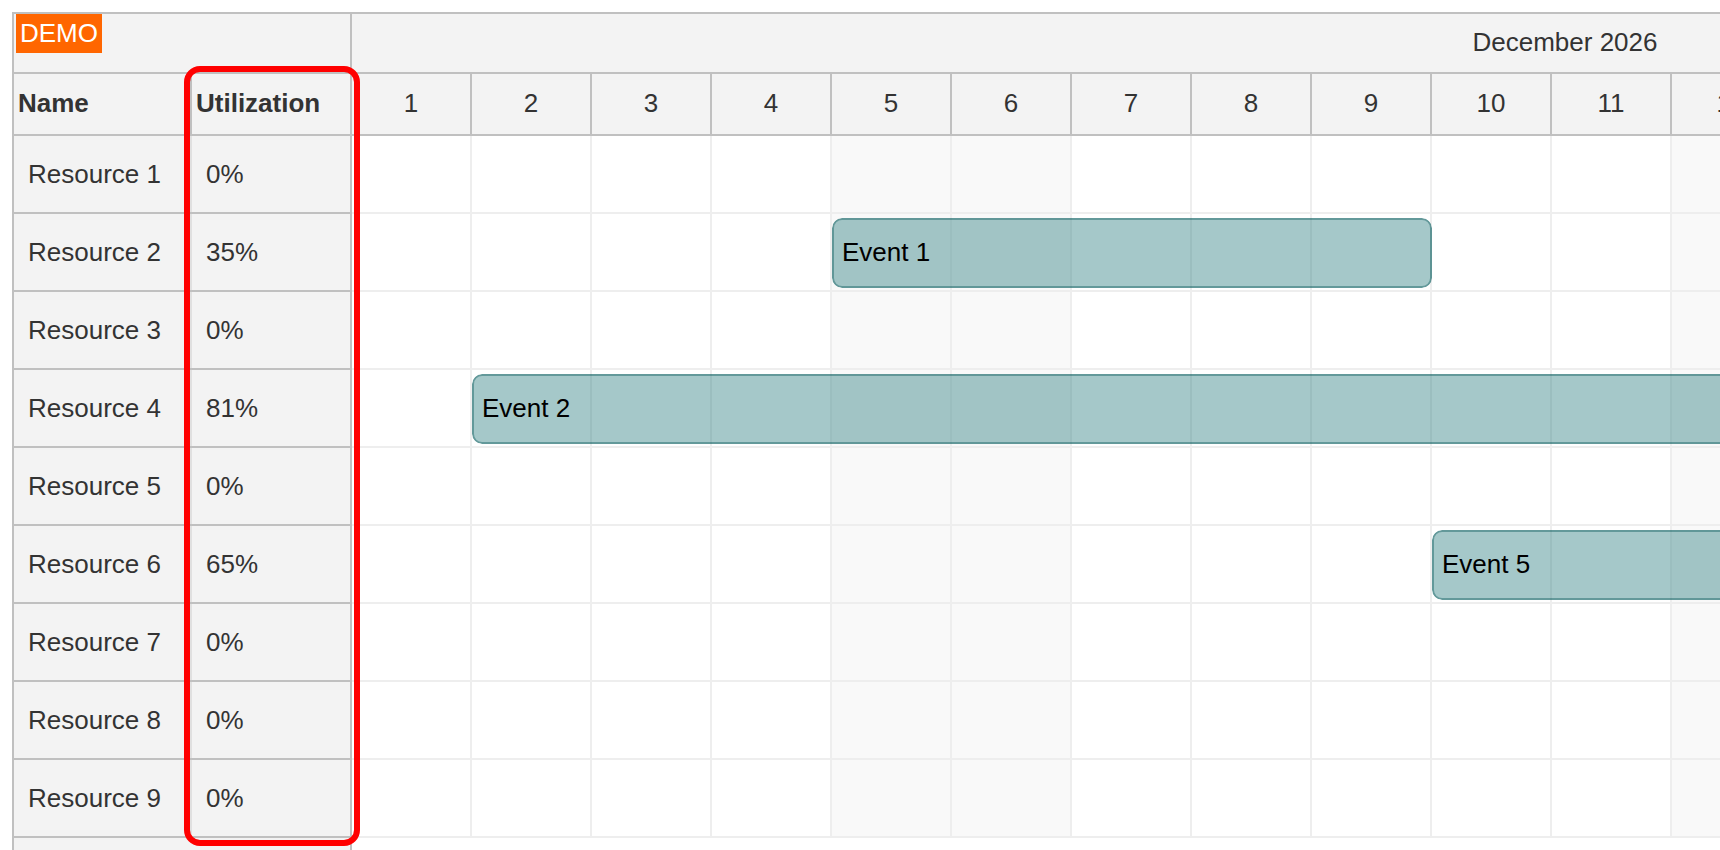
Our goal is to show the percentage of slots utilized by the scheduled events. First, we define the row header columns in the Scheduler config:
const dp = new DayPilot.Scheduler("dp", {
  // ...
  rowHeaderColumns: [
    {text: "Name", display: "name"},
    {text: "Utilization"}
  ],
  // ...
});
Now we will use the onBeforeRowHeaderRender event handler which lets us define custom row header content. This event is fired for every row before the header is rendered. The row headers are also updated when the row content (scheduled events) changes - this ensures it will always display the correct data. In index.html, the handler starts as follows:
onBeforeRowHeaderRender: (args) => {
  // ...
}
In onBeforeRowHeaderRender, we need to calculate the total time occupied by scheduled events.
-
The
args.row.events.all()method returns all events that belong to the current row. -
We will add the durations within the displayed date range, starting with a zero-length
DayPilot.Duration.
First, we can sum the whole event durations. This initial step from steps/01-total-duration.js displays occupied days and assumes that the events lie entirely inside the displayed date range:
onBeforeRowHeaderRender: args => {

  const utilization = args.row.events.all()
    .reduce((acc, e) => {
      return acc.add(e.duration());
    }, DayPilot.Duration.ofSeconds(0));

  args.row.columns[1].text = utilization.totalDays() + " days";
}
We have forbidden event overlaps during drag-and-drop operations (allowEventOverlap: false) so we can add the event durations without counting the same time twice. Events loaded or added programmatically must also be non-overlapping within each resource.
The list may include events outside the displayed date range. First, filter() excludes events that end at or before the range start or start at or after the range end. Then map() clips partially overlapping events to the range boundaries and creates their durations. Finally, reduce() adds those durations. Event end dates are exclusive, so a booking from December 5 to December 10 occupies five days. The calculation in index.html becomes:
onBeforeRowHeaderRender: (args) => {
  const rowStart = dp.visibleStart();
  const rowEnd = dp.visibleEnd();

  const utilization = args.row.events.all()
    .filter(item => item.start() < rowEnd && item.end() > rowStart)
    .map(item => {
      const eventStart = item.start() < rowStart ? rowStart : item.start();
      const eventEnd = item.end() > rowEnd ? rowEnd : item.end();
      return new DayPilot.Duration(eventStart, eventEnd);
    })
    .reduce((acc, duration) => {
      return acc.add(duration);
    }, DayPilot.Duration.ofSeconds(0));

  // ...
}
The range boundaries come from dp.visibleStart() and dp.visibleEnd(). In this example they cover the full December 2026 timeline, including weekends, rather than just the columns currently in the horizontal viewport. In index.html, we calculate the available time using those same boundaries:
const total = new DayPilot.Duration(rowStart, rowEnd);
Now that we have the total event duration and the total slot size, we can calculate the percentage in index.html:
const percentage = Math.round(utilization.ticks / total.ticks * 100);
We will display the calculated value in the “Utilization” column. Here is the complete text-only handler from steps/02-utilization-text.js:
onBeforeRowHeaderRender: (args) => {
  const rowStart = dp.visibleStart();
  const rowEnd = dp.visibleEnd();

  const utilization = args.row.events.all()
    .filter(item => item.start() < rowEnd && item.end() > rowStart)
    .map(item => {
      const eventStart = item.start() < rowStart ? rowStart : item.start();
      const eventEnd = item.end() > rowEnd ? rowEnd : item.end();
      return new DayPilot.Duration(eventStart, eventEnd);
    })
    .reduce((acc, duration) => {
      return acc.add(duration);
    }, DayPilot.Duration.ofSeconds(0));

  const total = new DayPilot.Duration(rowStart, rowEnd);
  const percentage = Math.round(utilization.ticks / total.ticks * 100);

  args.row.columns[1].text = percentage + "%";
}
For example, Resource 2 has 11 occupied days out of 31 and displays 35%. The chart implementation below replaces this text with active areas.
Select an empty time range in the full example to create an event, or move or resize an existing event. The affected row headers recalculate automatically. Changes are held in memory; reloading the page restores the original sample data.
Showing Utilization Chart in Scheduler Row Headers
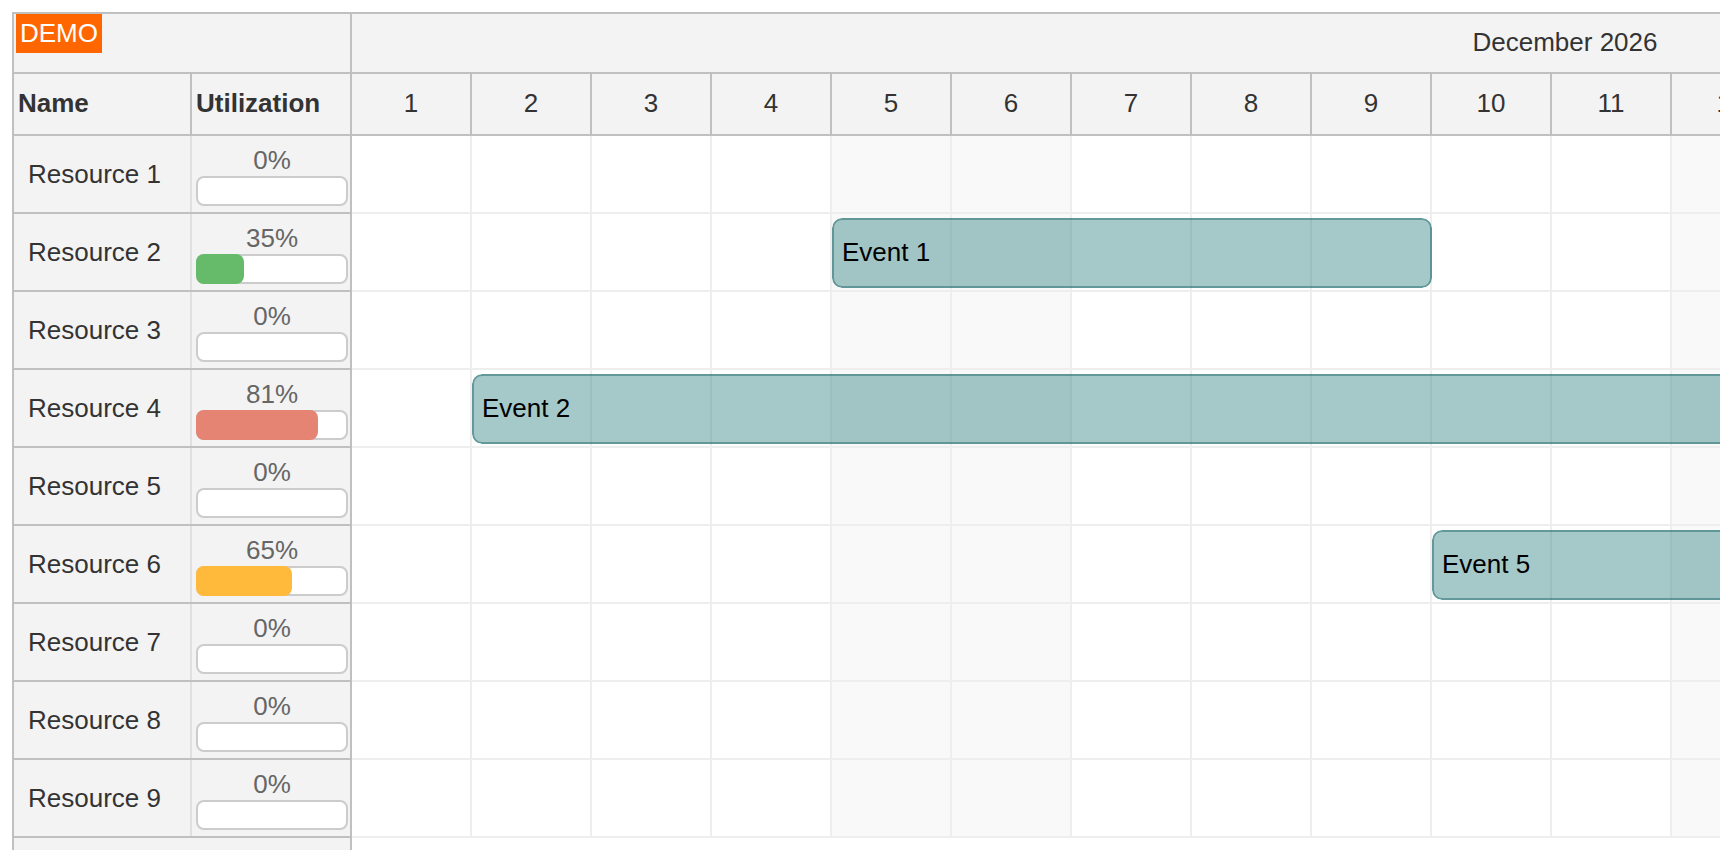
We have calculated the utilization percentage and rendered it in the row headers as text.
In this step, we will add a bar to each row header that will display the utilization graphically.
The utilization bars will use different colors, depending on the percentage:
-
Below 60%, the bar color is green.
-
From 60% up to (but not including) 80%, the bar color will be orange.
-
For utilization of 80% or higher, we will use red.
const getColor = (percentage) => {
  if (percentage < 60) return "#66bb6a"; // Green
  if (percentage < 80) return "#ffba3b"; // Orange
  return "#e58473"; // Red
};
To show the chart, we will use active areas - they let us create elements with custom position and styling:
-
The first active area creates the bar background (full width).
-
The second active area fills an area that corresponds to the calculated percentage.
-
The third active area will display the percentage text above the bar.
onBeforeRowHeaderRender: (args) => {
  // ...

  const percentage = Math.round(utilization.ticks / total.ticks * 100);

  const getColor = (percentage) => {
    if (percentage < 60) return "#66bb6a"; // Green
    if (percentage < 80) return "#ffba3b"; // Orange
    return "#e58473"; // Red
  };

  const color = getColor(percentage);

  args.row.columns[1].areas = [
    {height: 15, left: 2, bottom: 4, right: 2, backColor: "#ffffff", borderColor: "#cccccc", borderRadius: "4px", style: "box-sizing: border-box"},
    {height: 15, left: 2, bottom: 4, width: `max(0px, calc(${percentage}% - 4px))`, backColor: color, borderRadius: "4px"},
    {left: 0, bottom: 19, top: 0, right: 0, text: percentage + "%", fontColor: "#666666", horizontalAlignment: "center", verticalAlignment: "bottom"}
  ];
}
The bar leaves a two-pixel margin on each side. The CSS max() expression keeps its width at zero for empty rows instead of producing a negative width.
Full Source Code
Here is the full source code of our example. It calculates utilization for each resource displayed by the JavaScript Scheduler and shows percentages and a bar chart in the row headers.
<!DOCTYPE html>
<html>
<head>
  <meta charset="utf-8"/>
  <meta name="viewport" content="width=device-width, initial-scale=1">
  <title>JavaScript Scheduler: Resource Utilization Chart for Rows</title>

  <style type="text/css">
    p, body, td, input, select, button { font-family: -apple-system,system-ui,BlinkMacSystemFont,'Segoe UI',Roboto,'Helvetica Neue',Arial,sans-serif; font-size: 14px; }
    body { padding: 0px; margin: 0px; background-color: #ffffff; }
    a { color: #1155a3; }
    .space { margin: 10px 0px 10px 0px; }
    .header { background: #003267; background: linear-gradient(to right, #011329 0%,#00639e 44%,#011329 100%); padding:20px 10px; color: white; box-shadow: 0px 0px 10px 5px rgba(0,0,0,0.75); }
    .header a { color: white; }
    .header h1 a { text-decoration: none; }
    .header h1 { padding: 0px; margin: 0px; }
    .main { padding: 10px; margin-top: 10px; }
    .generated { color: #999; }
    .generated a { color: #999; }
  </style>

  <!-- DayPilot library -->
  <script src="js/daypilot/daypilot-all.min.js"></script>
</head>
<body>
<div class="header">
  <h1><a href='https://code.daypilot.org/58541/javascript-scheduler-resource-utilization-chart-for-rows'>JavaScript Scheduler: Resource Utilization Chart for Rows</a></h1>
  <div><a href="https://javascript.daypilot.org/">DayPilot for JavaScript</a> - HTML5 Calendar/Scheduling Components for JavaScript/Angular/React/Vue</div>
</div>

<div class="main">
  <div id="dp"></div>
  <div class="generated">Generated using <a href="https://builder.daypilot.org/">DayPilot UI Builder</a>.</div>
</div>

<script>
  const dp = new DayPilot.Scheduler("dp", {
    timeHeaders: [{"groupBy":"Month"},{"groupBy":"Day","format":"d"}],
    scale: "Day",
    days: 31,
    startDate: "2026-12-01",
    rowHeaderColumns: [
      {text: "Name", display: "name"},
      {text: "Utilization"}
    ],
    cellWidth: 60,
    rowMarginTop: 2,
    rowMarginBottom: 2,
    durationBarVisible: false,
    eventBorderRadius: "5px",
    allowEventOverlap: false,
    timeRangeSelectedHandling: "Enabled",
    onTimeRangeSelected: async (args) => {
      const scheduler = args.control;
      const modal = await DayPilot.Modal.prompt("Create a new event:", "Event 1");
      scheduler.clearSelection();
      if (modal.canceled) {
        return;
      }
      scheduler.events.add({
        start: args.start,
        end: args.end,
        id: DayPilot.guid(),
        resource: args.resource,
        text: modal.result
      });
    },
    onBeforeEventRender: args => {
      args.data.backColor = "#1E757766";
      args.data.borderColor = "darker";
      args.data.fontColor = "#000000";
      args.data.padding = 4;
    },
    onBeforeRowHeaderRender: (args) => {
      const rowStart = dp.visibleStart();
      const rowEnd = dp.visibleEnd();

      const utilization = args.row.events.all()
        .filter(item => item.start() < rowEnd && item.end() > rowStart)
        .map(item => {
          const eventStart = item.start() < rowStart ? rowStart : item.start();
          const eventEnd = item.end() > rowEnd ? rowEnd : item.end();
          return new DayPilot.Duration(eventStart, eventEnd);
        })
        .reduce((acc, duration) => {
          return acc.add(duration);
        }, DayPilot.Duration.ofSeconds(0));

      const total = new DayPilot.Duration(rowStart, rowEnd);
      const percentage = Math.round(utilization.ticks / total.ticks * 100);

      const getColor = (percentage) => {
        if (percentage < 60) return "#66bb6a"; // Green
        if (percentage < 80) return "#ffba3b"; // Orange
        return "#e58473"; // Red
      };

      const color = getColor(percentage);

      args.row.columns[1].areas = [
        {height: 15, left: 2, bottom: 4, right: 2, backColor: "#ffffff", borderColor: "#cccccc", borderRadius: "4px", style: "box-sizing: border-box"},
        {height: 15, left: 2, bottom: 4, width: `max(0px, calc(${percentage}% - 4px))`, backColor: color, borderRadius: "4px"},
        {left: 0, bottom: 19, top: 0, right: 0, text: percentage + "%", fontColor: "#666666", horizontalAlignment: "center", verticalAlignment: "bottom"}
      ];
    }
  });
  dp.init();

  const app = {
    init() {
      const resources = [
        {name: "Resource 1", id: "R1"},
        {name: "Resource 2", id: "R2"},
        {name: "Resource 3", id: "R3"},
        {name: "Resource 4", id: "R4"},
        {name: "Resource 5", id: "R5"},
        {name: "Resource 6", id: "R6"},
        {name: "Resource 7", id: "R7"},
        {name: "Resource 8", id: "R8"},
        {name: "Resource 9", id: "R9"}
      ];
      const events = [
        {start: "2026-12-05T00:00:00", end: "2026-12-10T00:00:00", id: 1, resource: "R2", text: "Event 1"},
        {start: "2026-12-02T00:00:00", end: "2026-12-18T00:00:00", id: 2, resource: "R4", text: "Event 2"},
        {start: "2026-12-19T00:00:00", end: "2026-12-28T00:00:00", id: 3, resource: "R4", text: "Event 3"},
        {start: "2026-12-15T00:00:00", end: "2026-12-21T00:00:00", id: 4, resource: "R2", text: "Event 4"},
        {start: "2026-12-10T00:00:00", end: "2026-12-30T00:00:00", id: 5, resource: "R6", text: "Event 5"}
      ];
      dp.update({resources, events});
    }
  };
  app.init();
</script>

</body>
</html>
You can download the full project using the link at the top of the tutorial.
History
October 28, 2026: Updated to DayPilot Pro for JavaScript 2026.4 and excluded events outside the displayed date range from the utilization calculation.